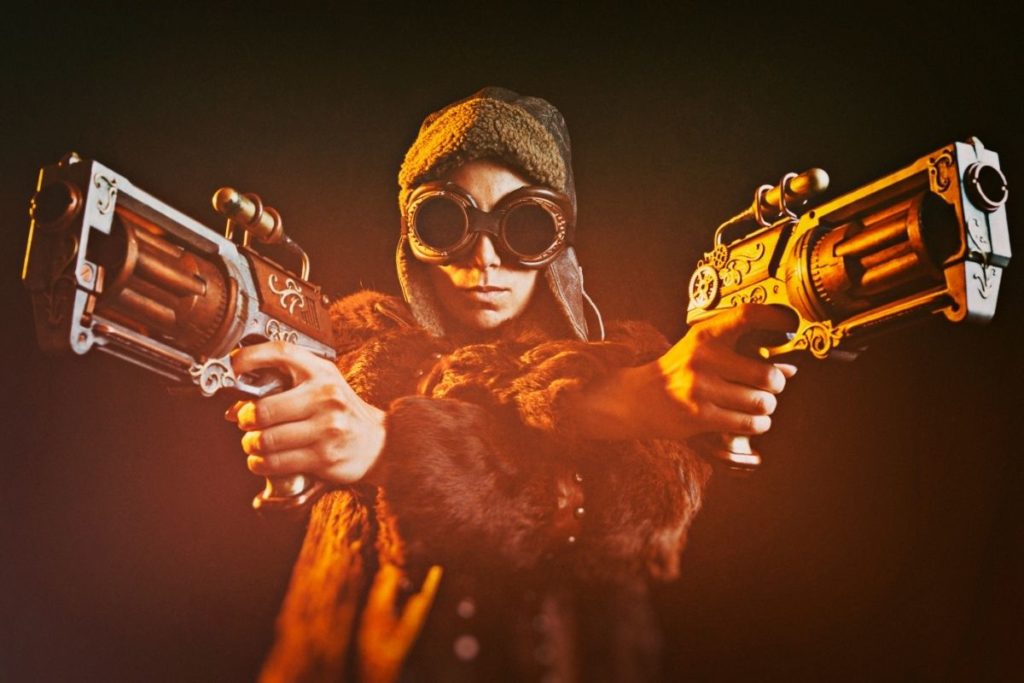
If you have spent any amount of time online looking at Steampunk props, then you’ve probably come across at least one Steampunk weapon or tool that is based on a Nerf gun.
The Brass color, with all sorts of extras and attachments, makes them instantly stand out from any kind of Nerf gun you might normally see in a toy store.
Nerf guns are actually one of the most popular pieces and props that are used in the Steampunk costume community.
They are usually very easy to get a hold of and can add a unique element to any outfit, especially those going for an adventurer or explorer look.
They are such a popular item to have in a Steampunk costume, there are even online stores that make and sell custom Nerf guns, designed for that classic Steampunk aesthetic.
Fortunately, you don’t need to spend hundreds of dollars on a custom prop for your outfit, or even years of experience in crafting and costuming to do it.
With a little paint, some patience, and a little help, you can turn any Nerf gun into a Steampunk prop.
We’ve created this little guide to help you do just that, with steps on how to make your very first Nerf Steampunk gun, as well as some extra tips on how to get the best results on your first try.
Once you’ve got a grasp of these basics, the only thing that will be limiting your Steampunk-prop adventures is your own imagination!
Let’s get started!
The Basic Steps To Steampunking-Up A Nerf Gun
Trying to make changes to your nerf guns so that they look like Steampunk tools and weaponry can feel a little challenging, especially if you have no experience in hobby crafting or painting.
But, starting out on your Steampunk odyssey doesn’t need to feel so intimidating. With a few tips, you can start making your own Steampunk props in your own home.
For a basic guide on how to turn your old Nerf guns into a fun little Steampunk prop, we have you covered!
Follow these instructions, and you’ll be on your way to building that dream Steampunk cosplay you’ve always wanted to make, but never got round to starting.
- Pick a nerf gun of your choosing. Whether it’s brand new off the shelves, something you’ve had in your home for a while, or from an old thrift store. If it’s a nerf gun, it’ll do just fine.
Just make sure it isn’t a family relative, like a sibling or your kid’s though, or at least get permission from them. They might not appreciate their favorite toy being scrubbed, painted, and changed as much as you will! - Find/buy some sandpaper, and start sanding down your nerf gun. This might look like you’re destroying your nerf gun, but trust us on this.
The glossy layer that covers most, if not all, Nerf guns, makes it very difficult for any new kind of paint to stick and bind to it, which would ruin any new layers you might want to add to it otherwise.
Before you do anything else to your Nerf Gun, make sure this layer of gloss is gone! Make sure you’ve given the whole gun an even scrub so that any paint you add will stick well to your prop. - Prime your Nerf gun with a base primer coat. You might be tempted to just get started painting on any gold or bronze paint you have, but before that, you should give it a base coat first.
This will make sure that none of the Nerf gun’s original colors show through, and give you a good base to start adding colors too.
There Are 2 Traditional Methods When It Comes To Giving Your Nerf Gun A Prime Layer
- Using a can of aerosol primer paint. Follow the instructions on a can of primer spray paint, and you should have a nice, even coat around your prop.
Make sure it is dry before you start spraying, or any moisture might ruin the base! - Applying an even layer of primer with a brush. This is arguably a method that takes longer and requires more patience of you, but if you don’t have access to spray paint, or an open, well-ventilated area to apply that spray, this is a safe alternative
Make sure to give your freshly-painted Nerf guns the chance to completely dry for at least a few hours, before moving on to the next step
- Time to start painting! For beginners, we would recommend using acrylic when painting onto your base coats, as they bind well to plastics. You can find acrylics paints both in liquid and as aerosols.
Whilst you can use any kind of colors that you want, keep in mind the colors you most often associate with Steampunk.
Try to stick to metallic paints, especially shades of silver, gold, copper, bronze, and brass. But ultimately, the choice is yours. Make your Nerf gun stand out from the crowd however you want! - Add any extra layers you might want. If you want to avoid making your Steampunk Nerf gun look like just a solid color, we recommend adding different colors to different areas of your Nerf gun, to make the separate components stand out more.
Once you’ve finished this, congratulations, you have your very first Steampunk Nerf gun!
Some Extra Notes To Keep In Mind When Crafting Your
- If you want a very thorough finish to your nerf gun, unscrew and disassemble your entire nerf gun before you start sanding it. Sanding and painting the parts to your nerf gun as pieces will give the finished product a much more professional finish to it.
Reassembling it will almost certainly be the most difficult part of this, however, as misplacing or breaking any small component could ruin the whole prop. Make sure you keep track of how it came apart and where the screw is, or follow a tutorial on how to do this. - If you are using a can of spray paint to decorate your Nerf gun, make sure you are in a nice open area, and that you are wearing a ventilation mask whilst you spray. Aerosols can be very dangerous and toxic to your body if they enter your respiratory system.
But so long as you follow the instruction on the aerosol can and do this in an open space with plenty of air to breathe, it is a perfectly safe method of painting. - If you don’t want any paint to spill over onto the layers you have already completed, try covering the finished layers with paint masking tape. It’ll help keep the finished product nice and clean
- Spraying a layer of sealant aerosol over your Nerf gun once it’s finished is highly recommended, as it will stop the paint from wearing off as quickly.
- If you plan on taking this new Steampunk prop into public spaces, such as at conventions, make sure that you paint the barrel, or the muzzle of your nerf gun a bright, unnatural color.
Whilst this might feel like deliberately ruining all your hard work, a Nerf gun painted with metallic colors can often make it quite similar to actual real-world firearms.
And being spotted in a crowded area with something that looks like a firearm, can cause local security or any law enforcement to react with appropriate, and sometimes deadly force.
There is a reason that most nerf guns are sold in bright colors, such as orange, yellows, and blues. A brightly colored muzzle or barrel is a useful way of being able to let people know that what you are holding is a prop and not a dangerous tool that could hurt or wound others.